

Defining a planet cartography
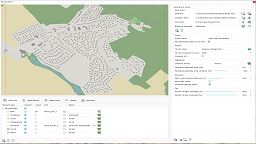
The atlas view - accessed by double clicking on any atlas - contains a cartography tab that'll store all resources needed for the definition of a global terrain:

The atlas cartography contains four layers:
- Two layers of elevation data (one low resolution, one high resolution).
- Two layers of color data (one low resolution, one high resolution).
By default, all atlas cartography layers are empty, and the atlas does not contain any cartography data. If an empty atlas is dropped into the scene, it'll only modify the atmosphere of the scene, it won't set any terrain into it. On the other hand, if the atlas has cartography maps, it'll affect and modify the global landscape of the planet.
An atlas cartography is saved into a cache document (see Documents caches). The cache file of an atlas can be quite large, and can be archived with scenes for export.
Note that timestamps are informative: they can be used to keep track of the source data creation date.
The atlas cartography workflow
The atlas is used to add global planetary cartography to a scene following a simple sequence:
- Add cartography maps to different atlases.
- Calculate all atlases.
- Create a new empty atlas.
- Drop it into the current scene.
- Merge all cartography atlases that are needed into it (by dropping them into the scene).
- Save the merged atlas cache.
While there's only one single atlas in a scene, that atlas can be assembled from several dropped atlases that can be merged with it. Practically, several atlases with different cartography layers are defined separatedly, and then assembled and merged together for the purpose of a given scene. Then the result is saved so that it does not need to be reconstructed again.
Adding cartography maps
Two types of cartography maps can be added to the atlas:
- Elevation files, that must be .ASC files in the EPSG:4326, WGS84 coordinate system.
- Colormap files, that must be .PNG (or .JPG) files in the EPSG:4326, WGS84 coordinate system. Please note that a colormap file names XXX.png must be paired with a XXX.aux.xml file containing georeferencing data associated to the .PNG source file. These .aux.xml files are usually written when exporting data out of QGIS.
Elevation maps and colormap files in the right coordinate system can be generated using QGIS. See Using QGIS to prepare NDunes cartography for details on the QGIS image warping procedure to use to prepare files for NDunes.
- There are two layers of elevation / color maps for the atlas. One is low resolution, one is high resolution. On display, the high resolution data will override the low resolution data where it has been defined. See the Atlas display logic below for a better understanding of how the atlas will appear on screen.
Compiling the atlas
Once cartography maps have been added, click on the atlas calculation button on the toolbar to initiate the process. This can take several minutes if a lot of files have to be processed for the calculated layer.
Atlas display logic
If the atlas:
- Has no cartography data: it will not modify the relief. The scene terrain will be the source of all landscape data.
- Has cartography data: then the atlas will follow display rules involving all its layers.
The display is defined as following:
- A low resolution earth data model is displayed over the entire planet. This model is based on 1 km resolution satellite imagery.
- The low resolution elevation cartography model overrides the earth model (1) where its defined. This model is a full terrain definition with raw land colors / ambient occlusion / flow / reflectance / vegetation densities, reconstructed from the elevation maps.
- The high resolution elevation cartography model overrides both the earth model (1) and the low resolution elevation model (2) where its defined. It also has a full terrain definition reconstructed from the elevation maps.
- The low resolution color cartography model overrides the color defined by (1), (2) and (3). This layer does not override the elevation.
- The high resolution color cartography model overrides colors defined by (1), (2), (3) and (4). Similarly this don't affect elevation.
Let's walk through an example using a part of France:

Focusing on a region of France called Haute-Savoie. Here, in google maps.
We'll first create a low resolution elevation map layer using ASC files retrieved from the French geographic institute. There are several resolutions available, and we choose to use 5 meters accurate files, that are converted to .ASC WGS84 (see Using QGIS to prepare NDunes cartography).

Preparing a first set of ASC files for the display layer (2).
After compilation and drop of the atlas, we have the entire planet representation (1):

The overall earth view at low resolution, after the atlas compilation.
Right click on the atlas in the scene view and click on "Find" to automatically refocus on the atlas data:

After finding the cartography data. Where defined, the layer (2) overrides the layer (1).
Now we'll define a high resolution elevation layer (3). We proceed similarly, except that we'll source elevation files at 1 meter satellite resolution over a small portion of interest:

A smaller portion of the Haute-Savoie, at a 1 meter resolution.
You can notice a relief discrepancy between the world cartography layer (1) and the high resolution layer (3). This is due to the different sampling resolutions: The world layer (1) is sampled at 1 kilometer resolution while the high resolution cartography layer is at 1 meter resolution. Please also note that at 1 meter resolution or lower, generating large areas can quickly become expensive in terms of memory consumption and disk storage.
Then, we create another atlas and drop the two atlas we have calculated onto it. NDunes offers you to merge the incoming atlases within the new one. We accept both merges so that we create a combined atlas with the two elevation layers (2) and (3):

The merge prompt when dropping an atlas in a scene that has one already.

The merged atlas with layers (1), (2) and (3).
We can notice the difference between the 5 meters resolution layer (2) which is locally refined to a 1 meter layer (3).
Something that may sound a bit odd: colors are very different between the world layer (1) and elevation layers (2) or (3). This is mostly due to the lack of biomes by default in the scene. If we add a biome, the coloring has a much better match as illustrated below. Also note that the world layer (1) has all human influence embedded into it which isn't the case with layers (2) or (3) that are "naked" terrains:

Adding a biome to increase the matching between layers.
Now we'll do the same operations with low and high resolution color layers, which are sourced from satellite imagery, still available from the French geographical institute. One important point to consider is the fact that source satellite images are lit already. These are just satellite shots, taken at some hour of the day, so with the influence of the sunlight embedded in the imagery. This is shown below:

Raw satellite imagery.
These images are lit, they do contain shadows, they can be resulting of different tiles assembled under different lighting conditions. In a word, they're not easy to use "as is" in an environment that will make them lit again. The atlas has a color correction parameter available for the calculation of color layers: it can be used to reduce the intensity of already lit images resulting of satellites. It's generally needed to lower a lot the brightness of incoming images so they don't look too strong and react properly to changes in the sun direction, using atlas sliders for that:

Atlas color correction sliders used to remove excessive lighting in satellite imagery.
After merge of all possible atlas layers, we do see the elevation with a refined elevation where layer (3) was defined, and colors being replaced by satellite colors where defined by layers (4) and (5):

All layers assembled.
Mixing satellite imagery with NDunes 3D data
Reaching the last step of the previous paragraph, we do see a 3D display with "painted" satellite imagery. While this can be useful for many purposes, it doesn't leverage NDunes 3D elements (cities, biomes, terrain, decals, waterbodies...). We'll use decals to remove satellite imagery from layers (4) and (5) locally and get back to the naked terrain defined by elevation layers:

A decal removes satellite imagery layers to allow terrain, biomes to show.
In decal regions (or using any NDunes object that alterate the ground such as a waterbody or a city for instance), the satellite imagery layer is removed and replaced with NDunes native 3D data available there. Outside of these regions, the satellite imagery prevails.
 Defining a planet's atmosphere. Defining a planet's atmosphere. | Using QGIS to prepare NDunes cartography |
