

Using the camera toolbar
The camera toolbar is located on the top side of the main view by default. This toolbar has a dedicated explanation book here: Controlling the camera.

The camera toolbar and gizmo
The camera toolbar has three main purposes:
- Expose different navigation modes (first combo): Examine, Orbit, Fly or Top-down modes are accessible there. Examine mode allow a free rotation of the camera around all angles. When rotating the camera, if the mouse cursor is near the edge of the window, the camera will also rotate. Orbit mode (default) keeps the head up so the vertical remains always up. Fly mode is keyboard controlled and allow for game style navigation while Top-down is defined to look down toward the scene.
- Define key viewpoints that are stored in the current scene.
- Open the camera view to show and edit some camera properties like viewing distances and field of view.
Cameras are created in the scope of the current scene and will get stored with it. They can be recalled by double clicking the camera from the scene contents, or from the camera toolbar directly, after choosing the camera from the dropdown list.
By pressing the right side icon of the camera toolbar we can open the camera view to see some informations: like near and far distances and camera speed.
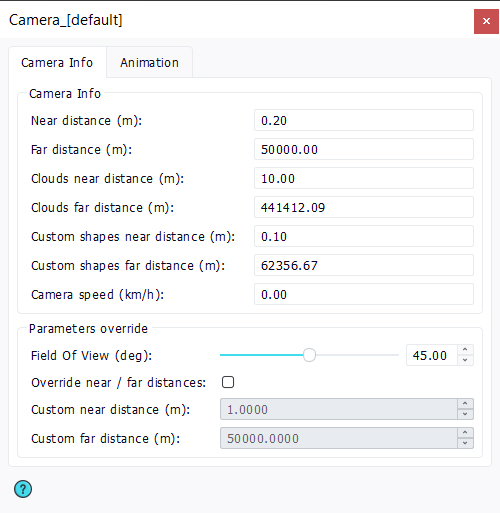
The camera view
Some camera properties can be overriden:
- The field of view, that can be set to a different opening depending on the camera focusing needs.
- Near and far clip distances can be overriden: This can be used to solve a bit of z-fighting artifacts that are common to real-time graphics. Increasing the near value generally solves most artifacts whenever possible (e.g. not too close from something that has to remain seen).
- The shadow focus distance can be overriden: this will force the best shadow quality of the image to be defined at a given distance from the camera. This can be used to bypass complex shadow rendering situations where a single shadow focus point may not be enough to get a good resulting shadow quality.
For more details about cameras and animation, please read Controlling the camera.
 Using the selection toolbar Using the selection toolbar | The sun tool |
