

Downloading and setuping the Blueprint input data.
You can setup 3 types of input data files in your blueprint document to generate a scene.
- OpenStreetMap file : a .osm file, used to generate the land areas, waterbodies, roads and buildings. This file is the quickest way to generate the scene environment, because all types of objects (buildings, roads, water, decals) can come from this one file.
- GIS file(s): a set of .json/.geojson files, typically exported from a GIS software (QGIS, ArcGIS...), containing the definition of polygons, lines or points to be interpreted as NDunes objects of your choice, just like the OpenStreetMap objects. These files are optional and can be added to the OpenStreetMap files or subsitute the OpenStreetMap file completely.
- Blueprint stylesheet(s): a set of blueprint documents in stylesheet mode, used to specify all the 3D templates to apply to the generated objects. These files are optional, you can either specify manually in the blueprint all the templates for your scene without using a predifined stylesheet, or even generate without templates at all and then apply everything in the 3D viewport. These are NDunes files, that can be downloaded from our Store, or created in NDunes. To learn more about stylesheets, see Creating your own stylesheets.
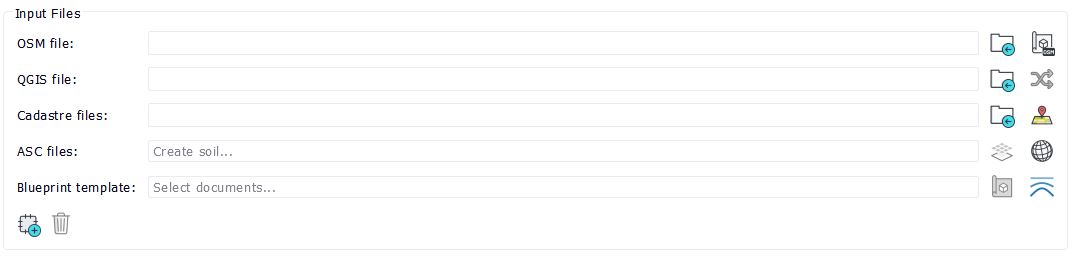
Input data setup
For all three sets of files, the right button opens an action specific to the file : either the browser where you can download your files, or setup options, etc.
Terrain definition according to satellite data and DEMs (Digital Elevation Models) are generated by the atlas (see Atlases) using cartography files. At the scene generation time, you'll be prompted for the atlas you wish to use to define the elevation and cartography layers of your scene.
OpenStreetMap File
If you want to use OpenStreetMap data for your generation, this OSM file is the first to set in your Blueprint document. You can only setup one OpenStreetMap file per blueprint document.
Note:
OpenStreetMap is a free, editable map of the whole world that is being built by volunteers largely from scratch and released with an open-content license.
To download your file :
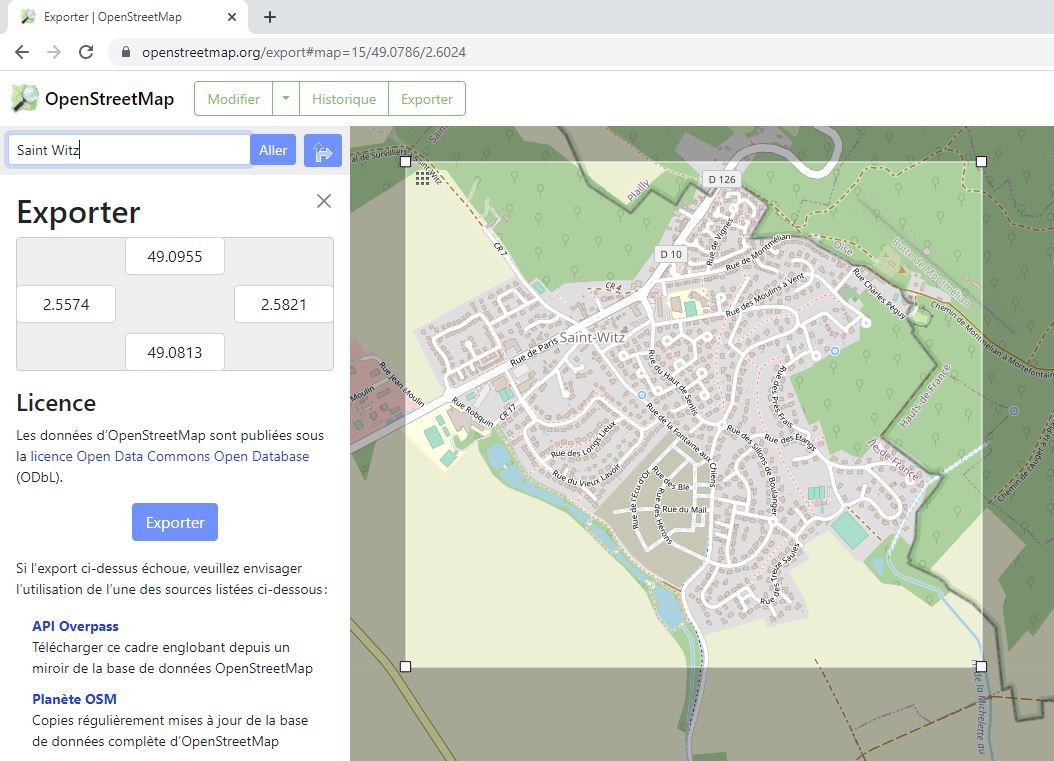
- Open OpenStreetMap
- Navigate to an area of interest.
- Select Export to download an .osm file
Once the file is downloaded :
- Move it to the "Blueprints" directory below the working directory; see here: Choosing a working directory.
- Select it in the Blueprint view, by using the "OSM file:" file selector
GIS File(s)
The GIS files are optional, but can either be used for you project in addition to the OpenStreetMap data, or completely replace the OpenStreetMap file.
Interesting GIS files you may want to import if you're working on a French Scene :
- The fields from RPG data base : Delimitation and biome type of each field, contrary to OSM farmlands that are very unprecise. The legend for the field acronyms can be found here.
- Buildings, landuse, roads, waterbodies, waterways... from BD TOPO data base : the BD TOPO is a very rich and precise data base for France. It can entirely replace OSM files. Some files are explicitely supported in NDunes and we recommand their use : BATIMENT.shp, ZONE_DE_VEGETATION.shp, TRONCON_DE_ROUTE.shp, PLANS_D_EAU.shp and COURS_D_EAU.shp. Other files can be imported as custom files.
- Garden data from Cadastre or from BDParcellaire : these polygons are necessary to generate gardens around your buildings.
In NDunes, it is not possible to directly import QGIS shapefiles or DWG files or other proprietary 2D file formats. They must be converted into geojson files using QGIS or other softwares beforehand.
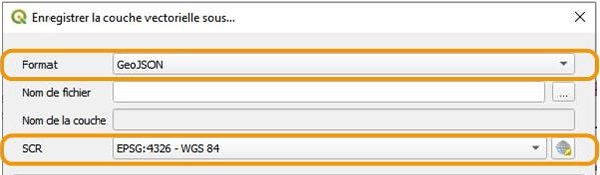
The files supported by the blueprint must respect the following criteria :
- Geojson/Json export format
- WGS84 coordinate system
- Contain geometries of type : "Point", "Polygon"/"Multipolygon" or "LineString"/"MultiLineString"
- At least one attribute/property of type String per object for classification
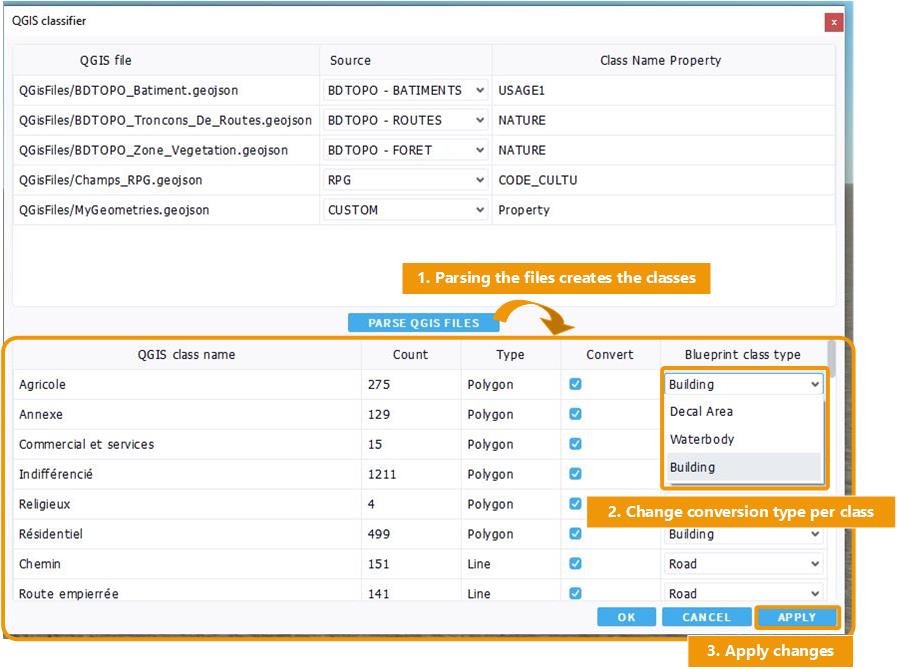
Make sure to set all these things when exporting your GIS layer into a geojson file as shown in the image below for the QGIS software.
After importing the GIS files in NDunes, you must open the GIS Classifier widget by clicking on the button at the right of your GIS files, in order to convert your imported GIS objects into blueprint objects. Otherwise, you won't see anything on your blueprint.
The QGIS classifier is divided into 2 sections :
- The parsing section
- The conversion section
Parsing Section
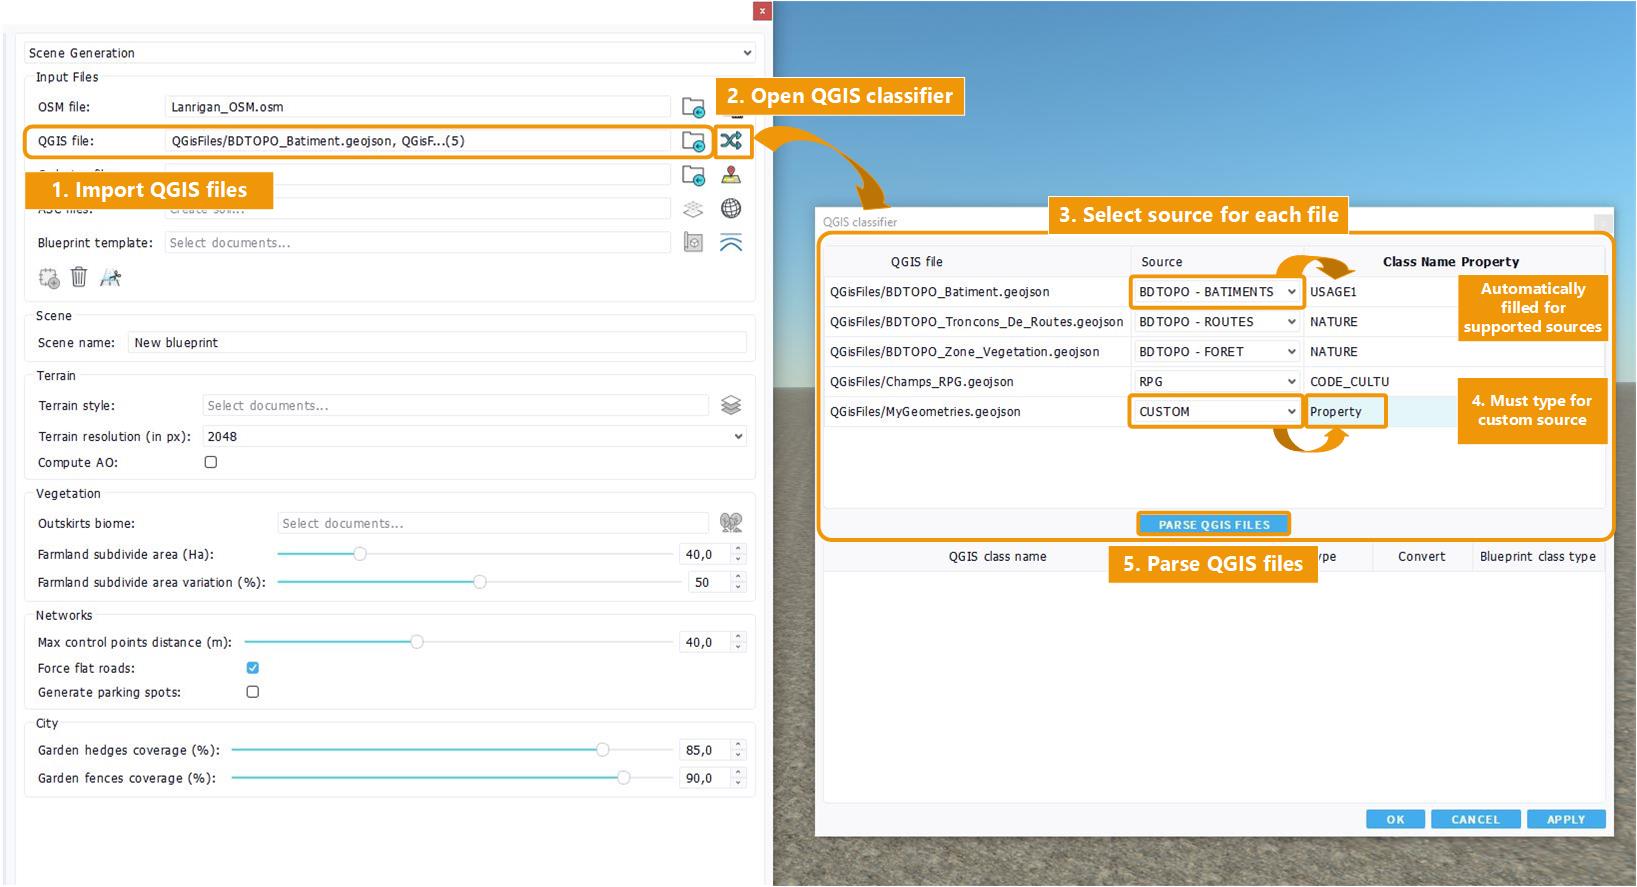
QGIS Classifier - Parsing Section
In the parsing section, you will let NDunes know what GIS files you have imported and how you want to exploit them. Contrary to Open Street Map objects, a GIS object can represent anything the GIS user had in mind, as there is no semantic classification. So NDunes does not know if a particular polygon is a lake or a forest or a sidewalk, etc.
If you have imported a supported file from the source list, select the correct source and the parsing options will automatically be set. Supported sources are :
- Some BDTopo files : "Zones de Végétation", "Tronçons de routes", "Batiments", "Plans d'eau", "Cours d'eau" (Other unsupported files from BDTopo can be imported as Custom files, see below for how).
- RPG file "Parcelles Graphiques"
- Cadastre files "parcelles.json"
- BD Parcellaire file : "parcelles"
If you have imported a custom file, select the "CUSTOM" source. You will then have to type the "Attribute/Property" string yourself.
Note:
What is the Attribute/Property string ? Your QGIS objects have a set of attributes called "properties". Any given attribute/property can be used for parsing as long as it is of type String in QGIS. The property you chose for the "Attribute/Propery" string will determine how the blueprint classes will group objects together. Two objects that have the same value for the chosen "Attribute/Property" string will end up in the same group in the blueprint, which means they will be generated with the same templates in 3D in NDunes.
Once every source file and "Attribute/Property" strings is set, you can hit the Parse files button. The section below will then fill with all the classes found in your QGIS files.
Troubleshooting:
If some of your objects do not appear after hitting the "Parse files" button, it is very likely that the "Attribute/Property" string chosen is incorrect.
If you selected a pre-supported source (for example BDTOPO - Zones de Vegetation), please make sure the associated geojson file trully comes from the conversion the correct source file (Aka from "ZONE_DE_VEGETATION.shp").
If you selected the "Custom" source, please make sure the "Property/Attribute" string does not have any typo (including caps or spaces). You can open the geojson file in any text editor (like Notepad or Word) to check that the string is the same in the file as the one you entered in the Blueprint.
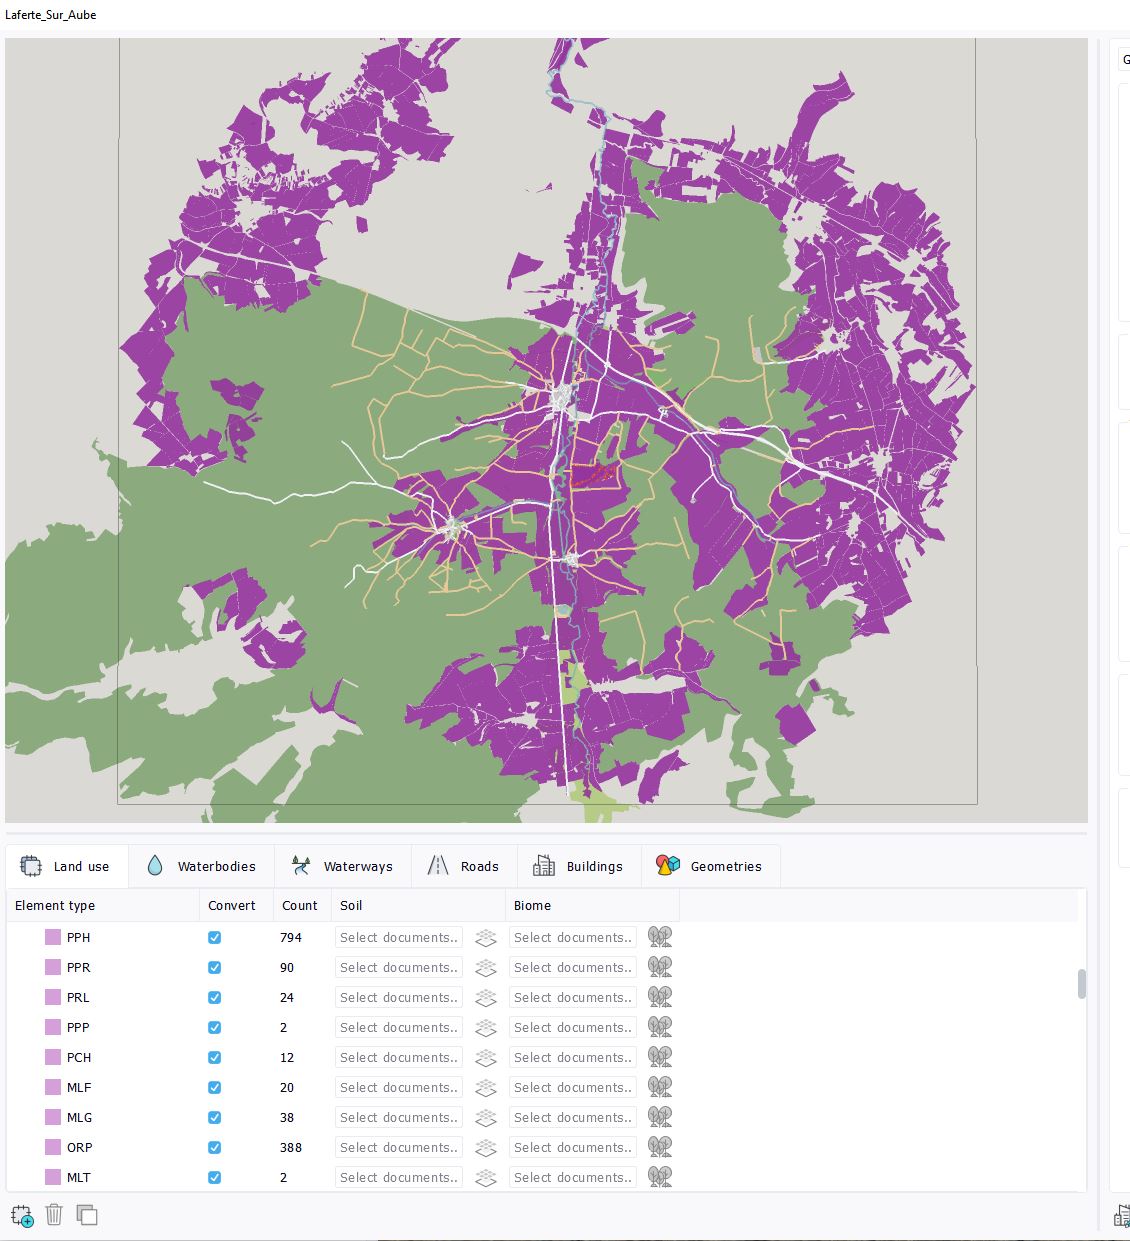
Conversion Section
QGIS Classifier - Conversion Section
Then in the conversion section, for each class of objects (grouped together if they had the same Attribute/Property value in the QGIS file), you can select if you want them converted as blueprint classes, and under what kind of NDunes object. Options depend on the geometry type of the QGIS object :
- Polygons/Multipolygon objects can be converted into Decal Areas, Waterbodies, Buildings or Gardens.
- Point objects can be converted into Geometries or Plants
- LineString/MultiLineString can be converted to Roads or Waterways.
Once you have chosen the NDunes conversion type for every GIS object groups, clic OK and the blueprint classes will be updated instantly. The CUSTOM shapes will appear in purple color on top of other objects, that have colors depending on what they represent.
Note:
Be carefull when using OpenStreetMap AND BDTopo/RPG inputs. The software does not forbid you to do it but if you import the same object (for instance, a house) from OpenStreetMap and from BDTopo - BATIMENT, your house will be twice in the Blueprint, and then twice in the 3D scene. This will lead to important performance issues and possibly a bad rendering as well. What is recommanded is to use either OpenStreetMap or BDTopo, otherwise be carefull what you are doing and keep in mind this possible duplication issue !
Blueprint Stylesheet(s)
What is a blueprint stylesheet
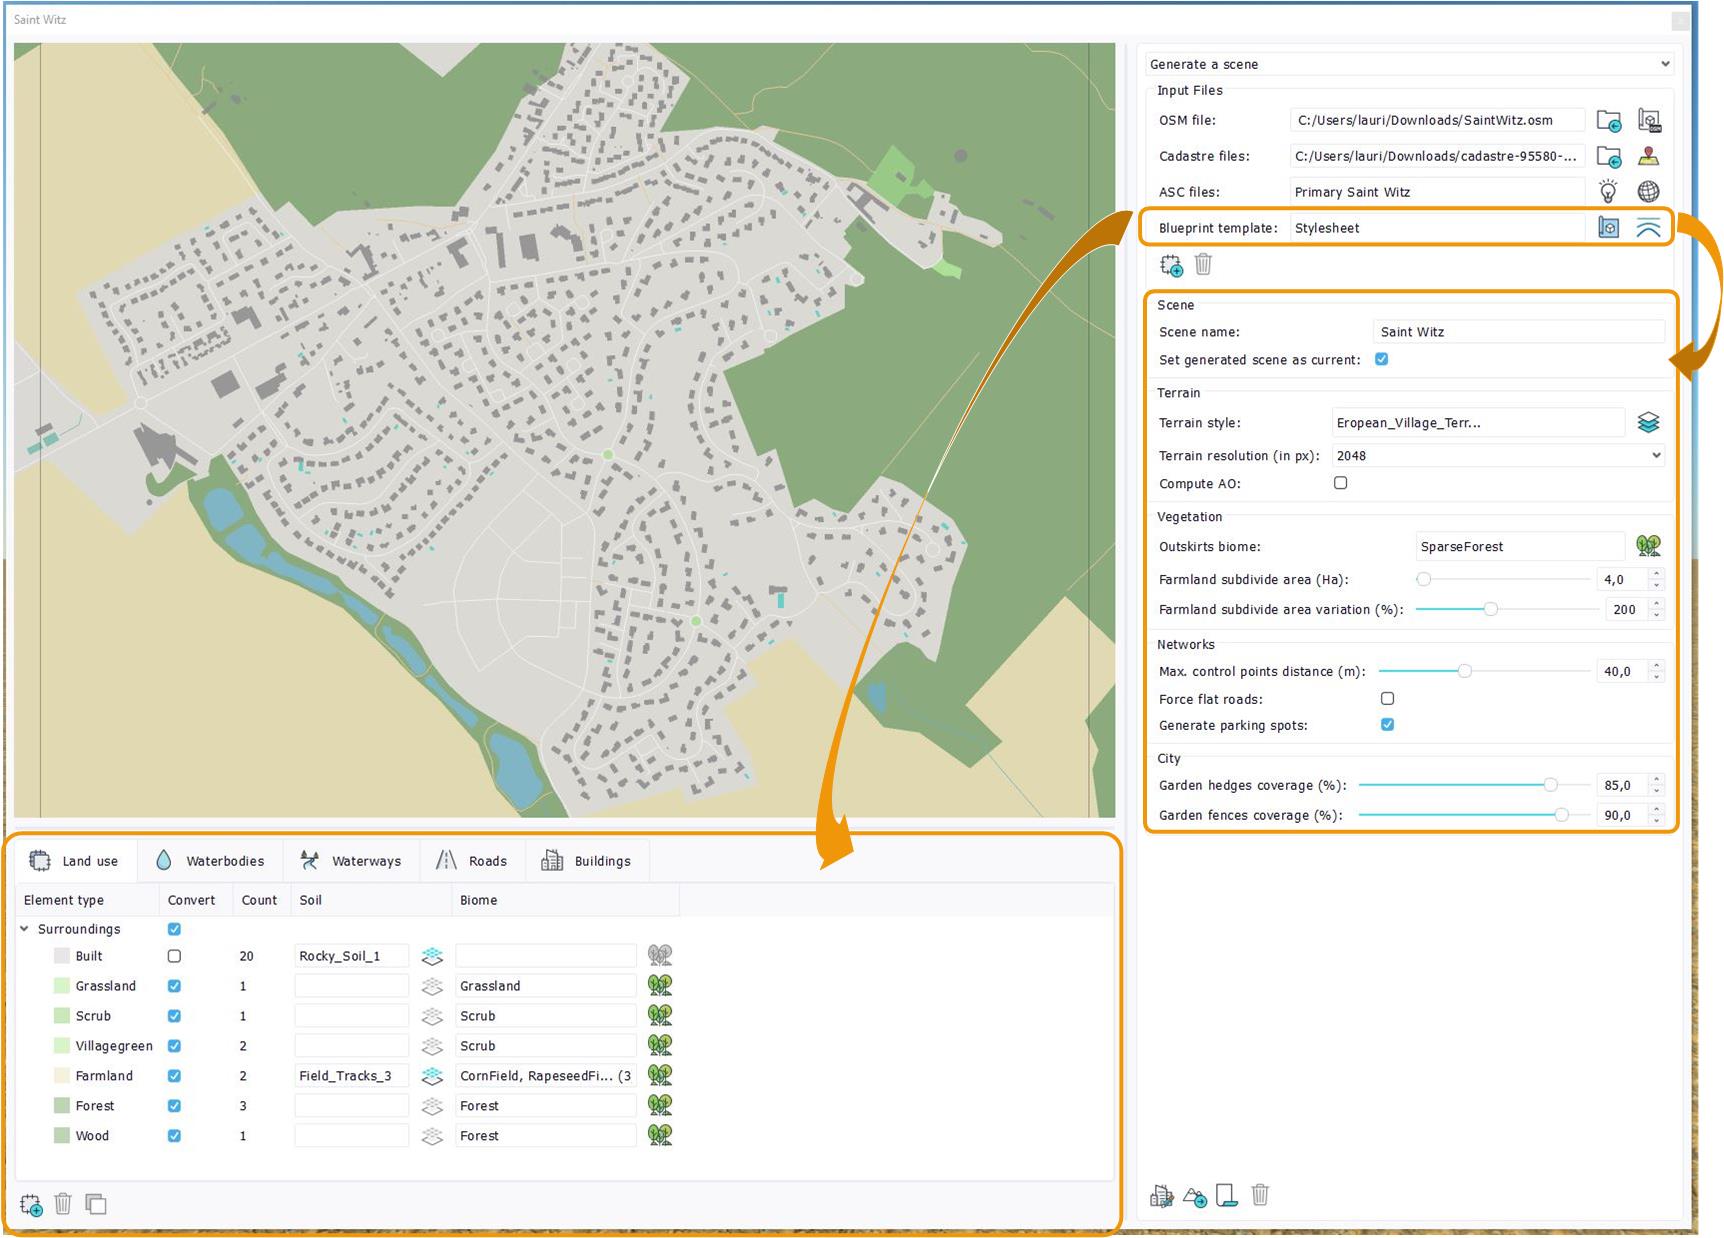
A Blueprint stylesheet (or Blueprint template) is a particular type of Blueprint document that saves the association between a 2D category ( from OpenStreetMap, IGN, QGIS... ) and NDunes associated documents.
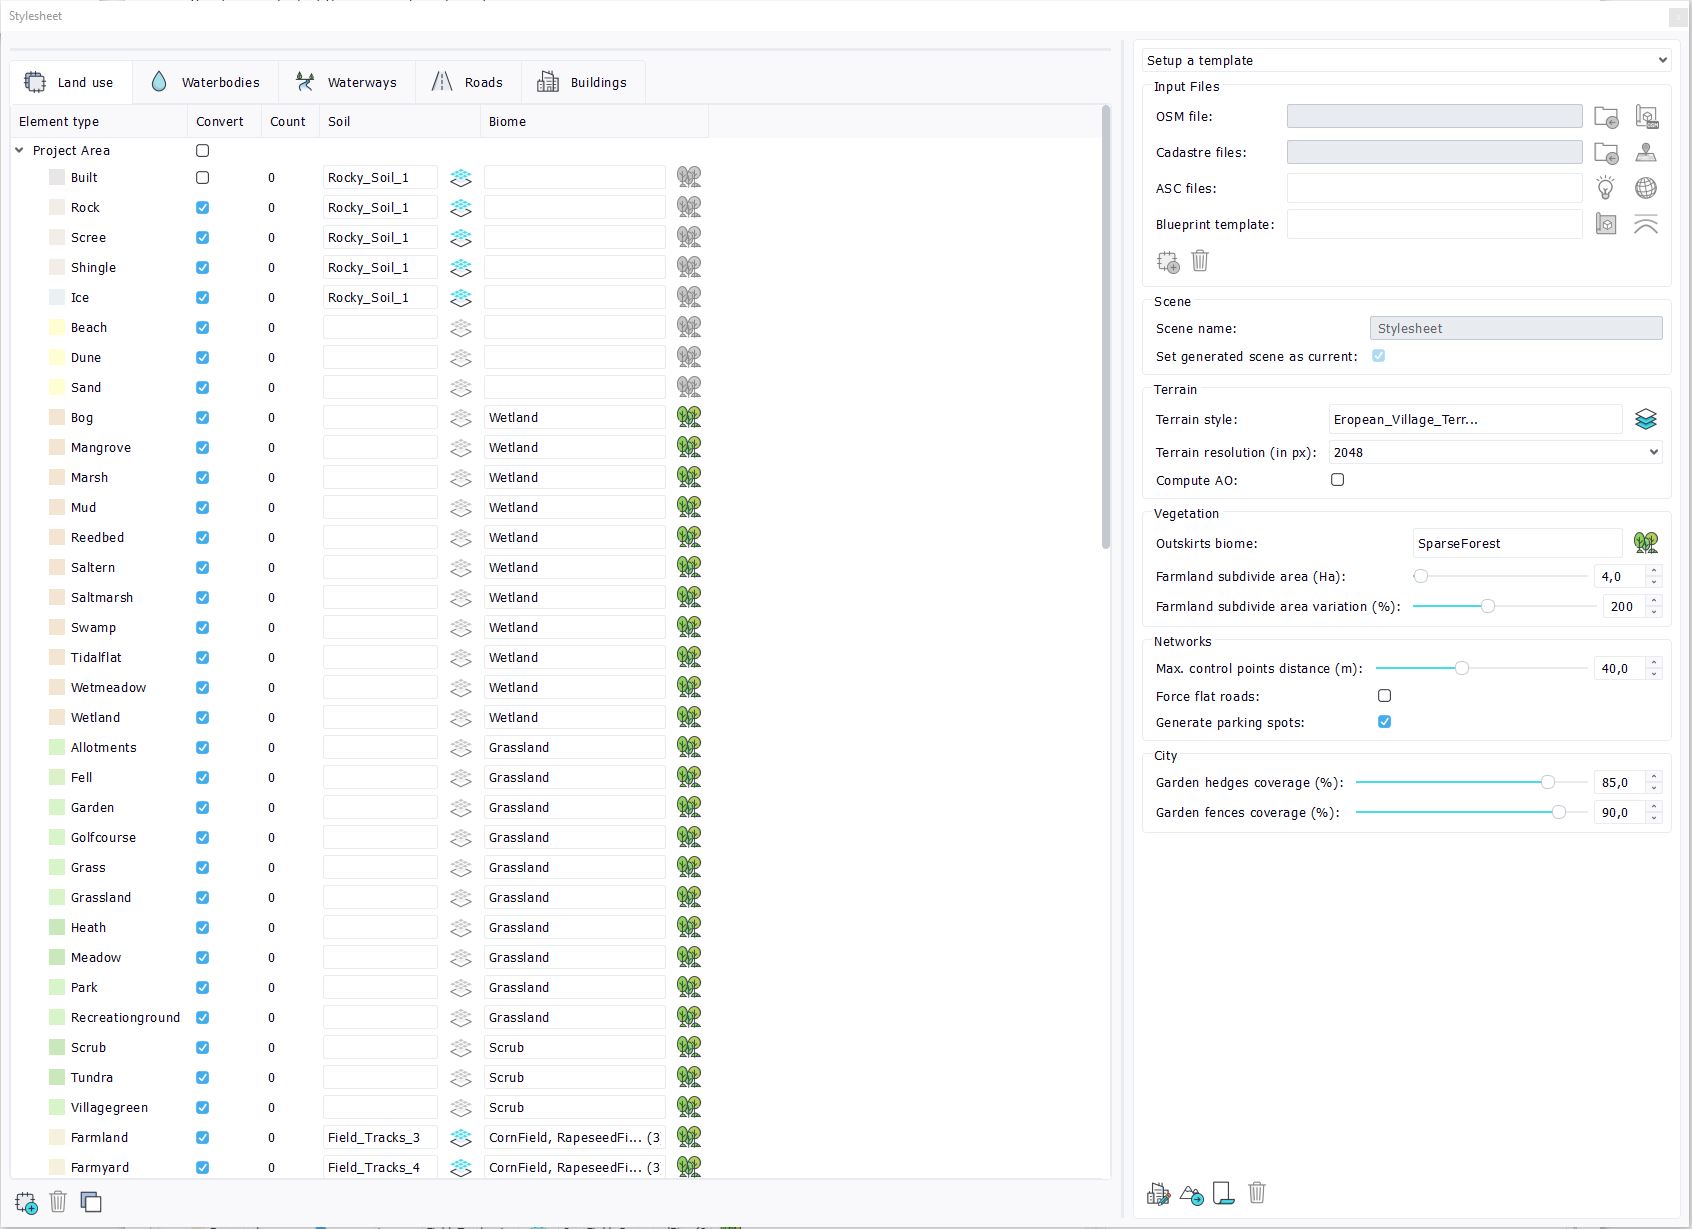
For instance here, an OSM land area of type "Rock" will be generated in NDunes as a decal area with a Soil document named Rocky_Soil_1. The "Bog" OSM area will have the biome "Wetland" spawn in it. For general scene specifications, we can see here the biome SparseForest will spawn in the outskirts of the scene.
How do I get a Blueprint Stylesheet ?
1) Blueprint stylesheets can be directly created in NDunes. To learn about creating your own stylesheets, please refer to Creating your own stylesheets.
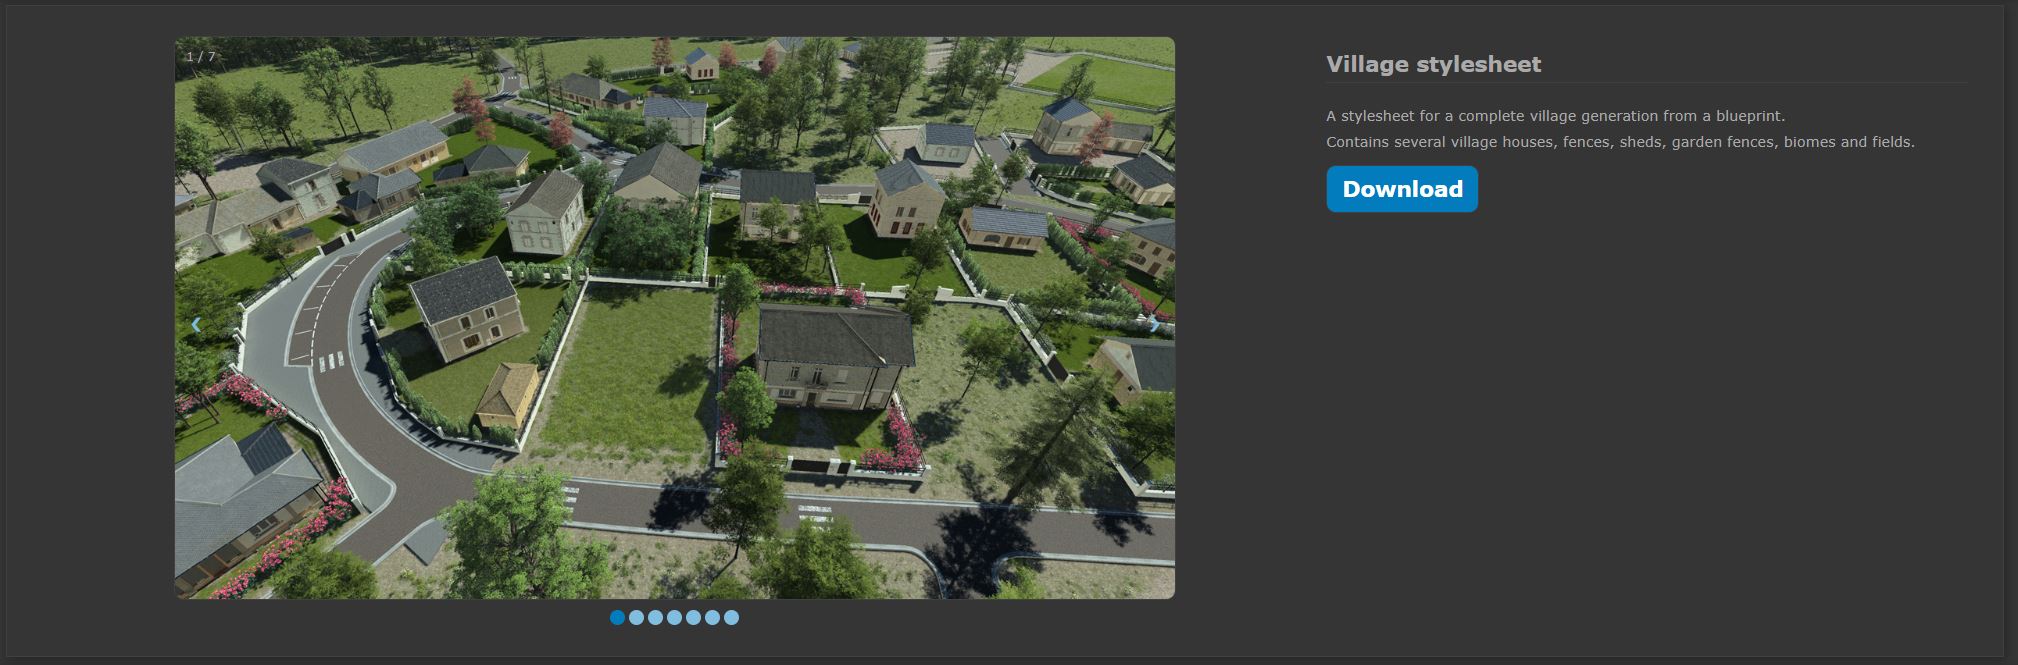
2) Or you can download a ready-to-use stylesheet from the NDunes' store. Our stylesheets are setup by artists to respect a visual coherence, as well as optimize the balance between perfomances and rendering quality in NDunes. To download an NDunes stylesheet:
- Open NDunes Store website.
- Navigate to the "Blueprint" category and click on the stylesheet you like.
- Clik on the "Download" button. (If you only see a "Subscribe", it means that you are either not logged in on our website, or you don't have a store subscription at the moment).
Once you've hit the download button, you will be invited to open NDunes : accept. In NDunes, the download of the stylesheet will begin. Downloading a stylesheet means downloading all the documents (soils, biomes...) that this stylesheet is using. This operation can take a while as there is a lot of 3D data (up to 30 minutes depending on your internet connection). NDunes will be freezed during this process, please wait and dont try to cancel the download by killing NDunes.
Now that you have your stylesheet
Now that you have a Blueprint stylesheet, you can select it using the "Blueprint template" document selector. As soon as you have set the Blueprint template, all the OSM categories and Scene parameters of your blueprint will fill up automatically.
Note that if you had already changed valus in the Scene Parameters or Customization of classes sections, your changes will be overriden by the new stylesheet values.
You can add several stylesheets in your blueprint, to cover data from different sources (OSM, QGIS...). If 1 category is covered by 2 different stylesheets, the settings from the last stylesheet in alphabetical order will be applied.
Note:
Make sure you're using the correct stylesheet ! If you're using an OpenStreetMap file, use the OpenStreetMap stylesheet. If you're using IGN files, use BDTopo and RPG stylesheets.
If you want to customize the stylesheet values, please refer to Customization of classes and Scene parameters. If you want to generate your scene based entirely on the style defined by the template, you can skip those two steps and go directly to Generating the scene
Redefining your area
Once you've imported all the input data you need, you may want to restrict the area you want to export in 3D from the blueprint. For this, you have 2 options : creating an export area, and/or cutting objects that continue outside your bounds.
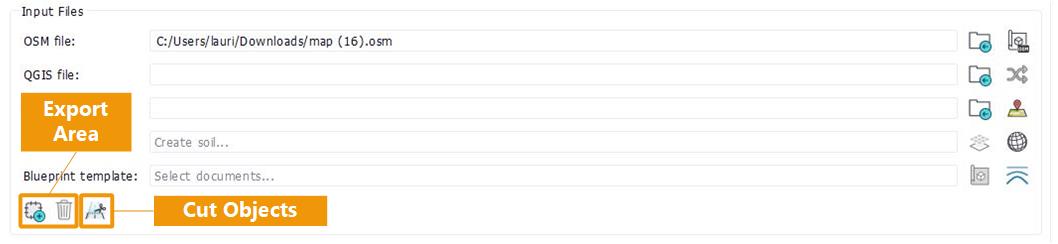
Export Area
Creating an export area
If you don't define an export area, all the objects contained in your OpenStreetMap and QGIS files will appear in your blueprint view, and will be exported in 3D at generation. If your files cover an area that is too big, you can reduce it by using the export area function.
To create an export area, click on the Create button, and start drawing a rectangle in the blueprint view. All objects that are completly outside of this rectangle will disappear from your blueprint. To delete your export area, click on the Delete button. You must delete an existing export area before creating a new one or modifying it. There can only be one rectangle at a time.
Cut objects by the bounds
Cutting objects by the export area
By default, imported objects area kept whole, and are exported as long as the have at least a portion of the object inside the export area.
However, some imported objects (especially OSM landuse area or rivers and roads) may be very big and go way beyond your area of intersest. If this is the case, it can be intersting to cut them and remove the parts of the objects that go beyond the export bounds you have chosen. To do this, toggle the "Cut Objects" button.
Note:
Please note that buildings are not cut by this functionnality, because we want to preserve their shape and size. Moreover, buildings are not usually the really big objects that cause issues.
 Blueprints Blueprints | Scene parameters |
