


Rendering and animation
Project Integration and Draft Mode
Once you are all done, you can exit the draft mode on the City and the Network documents. This will display the templates you applied to the buildings and roads of your scene instead of the white boxes. This step can take a few minutes depending on the ammount of templates you are using in your Scene. There are several ways to exit the draft on Cities and Networks.
Solution 1 :
- Open the City/Network view
- Click on the "Exit draft mode" button in the view
Solution 2 :
- Select the City/Network from its tree view
- Click the "Exit draft mode" button in the tree view
Solution 3 :
- Click the "Draft mode" button in the Scene tree view
Once the process is done, check your FPS. Generally the minimum you should aim for is 15 FPS to still be able to interact with your scene smoothly. If your FPS are lower than 15 after exiting the draft mode, you might have to lower the ammount of templates you are using in the scene or reduce the converted area in the Blueprint.
Rendering setup and Render
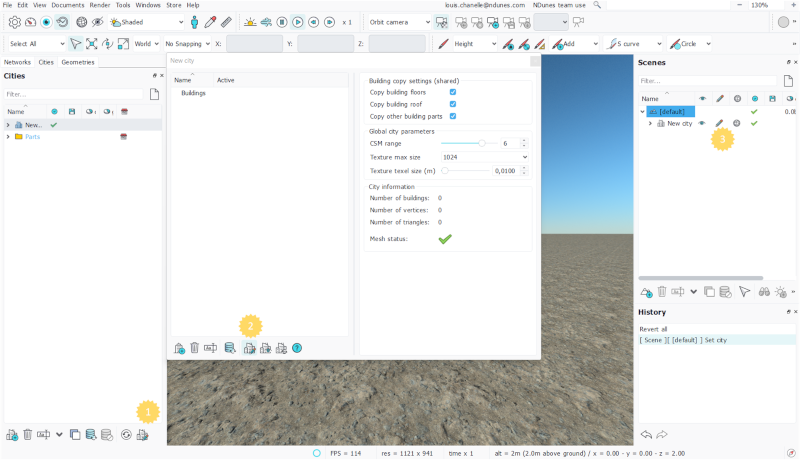
Before rendering the animation we need to take a look at the rendering setup window. This is where you can chose the resolution of your video, the framerate and which camera to render.
To open the render setup window, click on "Render" in the menu bar and "Rendering setup" then follow these steps to have a optimized render :
- Make sure the Render preset is on "Render"
- The default resolution of 1920x1080 can be left as is. You can change the of Image width (px) and Image height (px) if you need
- (optional) Change the output folder if needed. The default location is at the root of you working directory
- Make sure the "Show gizmo" check is unchecked
- In "Animated Camera" select the Camera track that you want to render
- Change the Frame per seconds according to your need. The more Frame per seconds, the longer the render process will take
- (optional) Adjust the Start and End time of your Camera track if needed.
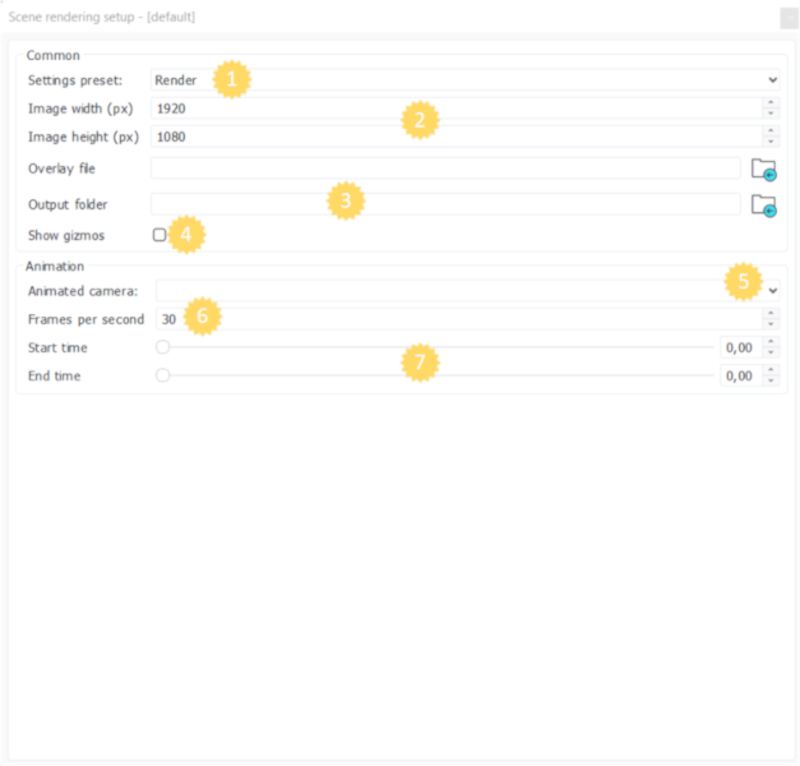
Additionnaly for better quality in your render you can :
- Click on the "Settings" button in the Toolbar
- Change the "Preset" parameter to "Render"
- Change the Full scene anti-aliasing to x4
Note:
Changing the FSAA to x4 will greatly impact the time needed to render the animation
Finally when you are ready to render your animation simply Click on "Render" in the menu bar and then "Render camera animation"
Repeat this step for every camera you want to render in your scene by changing the rendered camera in the "Rendering setup" windows (step 5).
To render an image simply select the camera in the camera dropbox in the toolbar and press F10 or Click Render>Render Image in the menu bar.
 Global Illumination and Tone Mapping Global Illumination and Tone Mapping |
